Thursday, October 29, 2015

Miso Cookies [slice and bake]


Don't be fooled by these ordinary looking cookies. There's miso in them! Yup, that's right.. it's the same miso you would use to make miso soup. 

Miso righteously does its job to elevate the aroma and flavor of these yummy bites. 

Savory.
Sweet.
Earthy.
Buttery.
(&Toasty- thanks to the sesame.)

The taste is indescribable, but perfectly balanced and favorable. 


Miso Cookies

recipe adapted from Anncoo Journal
makes about 36 cookies

200g plain flour, sieved
1 egg (60g), lightly beaten
100g unsalted butter, softened
60g sugar
25g white miso paste
1tbsp white sesame seeds, toasted

Reduced sugar from 100g to 60g.
Step 5: fold until soft dough forms.
Step 6: roll dough into log.
1. In mixing bowl, beat butter on low speed for 1 minute.
2. Add in sugar and miso. Continue beating until light.
3. Add beaten egg gradually and mix well. 
4. Pour in flour and sesame seeds. Continue to mix at low speed for about 30 seconds. 
5. Fold batter gently with a rubber spatula to become a soft dough.
6. Place soft dough on greased proof paper and shape into a log and roll it up. 
7. Place in the freezer for 30-45 minutes for the dough to harden for easier cutting.
*I left my overnight in the freezer. 
8. Cut dough into 0.5cm thick and place on baking tray lined with parchment paper.
9. Bake at preheated oven 356F for 15 - 20 minutes until slightly browned.
10. Leave to cool on baking pan and store in an airtight container.

Step 8: cut dough into 0.5cm thick.
Ready for baking!

I NEED to get more practice on how to shape square logs and cut them to even thickness. I attempted to make these square- googled how to use an empty parchment paper box to shape, failed and gave up. And just look at how uneven these cookie slices are. Oh wells, the flavor and texture weren't compromised, and it gave me an excuse to eat all the thinner pieces fresh out the oven. 
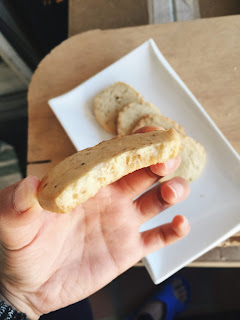


Nomnom.
Taste: 5 stars out of 5
Texture: 5 stars out of 5


MISO wanting for more!



Tuesday, October 27, 2015

JAJANGMYEON aka Korean Black Bean Sauce Noodles [step by step photo tutorial]

Step by step on how to make some JAJANGMYEON:
_____________________________________________

Let's begin.

Start with something like this.
What's inside: fresh noodles and black bean sauce.
Pour black bean sauce into a bowl and set aside.
Fill two pots with water.
On high heat, bring water to a boil.
Cook noodles for approx. 2 mins.
Drain well.
Heat wok on high and evenly coat bottom with canola oil.
Place noodles in wok and toss/loosen briefly.
Pour black bean sauce on top of noodles.
Stir,
and toss..
until evenly coated.
Serves 4!
Nomnom.

The noodles have a great chewy texture, and the sauce is savory with a bit of sweetness.
_______________________________________________


#chefatwork
#worklife


Monday, October 26, 2015

Apple Rose Puff Pastry


These Apple Roses are totally pinterest worthy.
If all the photos, both surfacing on the web and on here, don't convince you to make this..
I don't know what will.


Apple Rose Puff Pastry
recipe adapted from Cooking with Manuela
makes enough for 12 roses

store bought puff pastry dough, thawed
2 apples *fuji
juice from 1/2 a lemon
water, enough to submerge apple slices
flour, to avoid puff pastry dough from sticking
unsalted butter, melted
sugar
cinnamon
drizzle of honey, to finish


APPLES: Prepare a bowl with some water and lemon juice. Cut apples in half, remove core and cut into paper thin slices. Place apple slices in prepared lemon water and microwave for 2-3 minutes to make them slightly softer. Check to see if they can bend and not break. If not, let them sit in the warm water or microwave for another minute. Drain and slightly cool.

PUFF PASTRY: Thaw puff pastry for about 15-20 minutes until softened. Place over a clean and lightly floured counter. Using a rolling pin, stretch the dough a little keeping it in a rectangular shape. Cut the dough into strips about 2 in x 9 in (5 cm x 22 cm).
*I had 6 sheets of 7.5 in x 11.5 in, halved them lengthwise, and ended up with strips about 3.8 in x 11.5 in. Should've cut three strips out of each sheet. 


ASSEMBLY: Melt butter and have sugar cinnamon mixture ready. (My sugar cinnamon mixture was roughly 2 parts sugar and 1 part cinnamon.) Place apples on top half of strip. Brush bottom half with melted butter and sprinkle with sugar cinnamon mix. Fold bottom half up. Brush with melted butter and sprinkle with sugar cinnamon mix again. Roll, seal edge, and place in greased muffin pan. Repeat for rest of apples and puff pastry.


BAKE: Bake for 40-45 mins at 375F until fully cooked. 
*I baked mine at 400F for the first 15 mins and lowered to 375F for another 45 mins.

Before | After
SERVE: Let cool briefly, drizzle with honey or dust with powdered sugar, and serve!


Taste: 4 stars out of 5
Could've been more heavy handed on the sugar inside the roll, but the honey drizzle at the end added just the right amount for mild sweetness. 
Texture: 4 stars out of 5
Crunchy and flaky exterior; a bit doughy for the inside layer possibly due to thick puff pastry dough strips. 


Btw, check out the Rose Apple Tart I made for my mom's birthday last year.

rough estimate
not including melted butter, sugar cinnamon mix, and drizzle of honey


Friday, October 23, 2015

The Ultimate Banana Bread [with crack on top]


Banana Bread achievement unlocked: golden brown crust with the crack on top!

I love love love love how brown and toasty this bread came out. To intentionally achieve the crack I've been wanting, I made a slit on the bread 24 mins into the bake time. The bread turned out beautiful and the texture was on point! It's quite a wholesome loaf with 4 bananas and 3 eggs going into it. 


The Ultimate Banana Bread
recipe adapted from Entertaining with Beth
makes 1 9x5" loaf

300g flour
70g sugar
1/4tsp sea salt
2tsp baking soda
4 overly ripe bananas, mashed
3 eggs
3/4cup (180ml) vegetable oil
1/4cup (60ml) water
1tbsp (15ml) vanilla
50g walnuts
50g chocolate chips*
(*I used 38g chocolate chips + 12g cacao nibs)


Got ripe bananas? Make banana bread!
Wet + dry mixture.
Fold in any toppings you want.
One big loaf!
1. Preheat oven to 350F (176C) degrees. 
2. Grease and flour a 9” x 5" loaf pan or line with parchment paper.
3. In a medium bowl mix dry ingredients and set aside. 
4. In a large bowl mix wet ingredients until combined. 
5. Combine the dry into the wet, 1/3 at a time, being careful not to over mix! 
6. Fold in chocolate chips and nuts. 
7. Pour into pan and bake for 55 mins or until a toothpick comes out clean. 
*If bread starts to brown too much on the top, cover with foil and continue to bake until cooked through.


Slice into thick slices and serve. Enjoy! 


The smell of this bread couldn't be any more wonderful. I couldn't help but stand by the oven door anticipating the moment I can put my nose right up to the bread. Allowing it to cool for the longest 10 mins of my life, I finally cut my first slice. The bread was firm, but oh so moist and fluffy! Woohoo. Unlike previous banana breads I've made, this one has the best texture yet - toasty crust, moist and fluffy inside. 

The original recipe calls for 100g, and I reduced mine to 70g. The sweetness was just right with each bite bringing more of the banana's natural sweetness out. Mom approved!


Should I experiment with whole wheat flour and coconut oil next time? I am scared to deviate from this already perfected recipe. 


Taste: 5 stars out of 5

Perfect sweetness. Delicious banana flavor. 
Texture: 5 stars out of 5
Toasty crust, soft and fluffy interior, with nutty and melty chocolate bits!


Update: this bread stayed soft for days and good both chilled and lightly toasted. 


Thursday, October 22, 2015

Black Sesame Petit Fours with Honey Cream


While most fear the making of macarons, I intensely fear the seemingly simple but extremely difficult swiss rolls.

I love swiss rolls. Growing up, swiss roll was one of the more indulgent items I get to have from Asian bakeries. It's cake in a portable and breakfast-friendly form. Swiss roll has a special place in my heart. It brings me back to the middle school days, and also recent years when I would go to the bakery with my mom and buy swiss rolls scraps at a discounted price.

So far, my attempts at swiss rolls have led to THREE fails and ONE success. That's a pretty low success rate, and the one time success was barely passable. Why does youtube make it everything look so easy?

Let me tell you what happened and also keep this as a reminder to myself to not make the same mistakes.

Black Sesame Swiss Roll (Petit Fours) 
recipe adapted from le jus d`orange
makes one roll or many petit fours

1 cup cake flour, sifted
1 tsp baking powder
pinch sea salt
5 eggs, separated into yolks and whites
3/4 cup - 1 tbsp sugar
1/4 cup whole milk
2 tbsp black sesame paste ( 2 tbsp black sesame ground up + 2 tbsp honey)

1. Line a jelly roll pan or deep baking dish with parchment paper. Prepare a clean tea towel and sprinkle powdered sugar over it. Set aside. Preheat oven to 400F.
2. Sift together cake flour, baking powder, and salt. Set aside.
3. Whisk together egg yolks, sugar, black sesame paste, and milk until pale yellow and thicker.
4. Whisk egg whites until foamy but stiff peaks form and stay in shape.
5. Add flour mixture to yolk mixture and fold until combined. 
6. Add 1/3 of the egg whites and fold until just combined. Add another 1/3 and fold. Add the final 1/3 and fold. The texture should be light but not fluid like water. It should be thick.
7. Spread batter into prepared baking sheet.
8. Bake for 7-8 minutes, until toothpick test comes out clean.
9. Run a knife around the edges of the pan to loosen the cake. Invert onto your prepared tea towel. Gently remove parchment paper. Gently roll, starting from the shorter edge, to create a loose roll. This shapes the cake without causing any cracks. 
10. Cool completely to room temperature.

Whipped Cream Filling (Frosting)
1 cup heavy cream, cold
2 tbsp honey

1. In a cold bowl, whip cream until stiff peaks form. Fold in honey. Cover and chill in fridge.

To assemble roll cake,
1. Gently unroll cake roll when it is at room temperature,  Spread whipped cream across the surface.
2. Tightly roll starting from the shorter edge. 
3. Wrap and chill for at least 1 hour. 

Whisk yolk and sugar until pale and thick.
Whisk/fold dry mixture in yolk.
Whisk whites until stiff peaks form.
*Note to self: start at low speed or whites will separate ):
Fold whites into yolk mixture 1/3 at a time.
Things usually goes wrong as I spread the batter onto the baking sheet. Either my baking sheets are never the right size, or the batter is always suppose to be paper thin.. Anxiety kicks in and doubts about whether just turning it into a chiffon cake surfaces.


The cake still managed to rise despite the thin layer and excess handling. However, the center was noticeably thicker than the sides. Being super careful not to overbake, I checked for doneness with a toothpick every minute after the 5min mark. Clean toothpicks and a light spring to touch were the cues that the cake was finally done at 7min.

Some suggest flipping the cake on a tea towel dusted with powdered sugar after it's done, as well as rolling it to prevent cracks after it's cooled. I decided to deviate and just let my cake cool in the pan covered with a bigger pan to not lose moisture. I went on to make my whipped cream while the cake was left to cool.

Feeling excited that everything was promising thus far, I flipped the cake onto a separate parchment paper and rolled it in to a log. The cake was flexible and did not crack!


I took my chilled cream out, dropped the first dollop on the cake, then realized I forgot to flip back the cake. "Oh wells, it's just aesthetic right?" was the passing thought. 


The top side which was now facing down on the parchment paper was.. STUCK! It was so moist that as I attempted to roll, it cracked. Worst nightmare.. so close to finishing yet one little thing ruined it all.


Swiss roll 1 - Me 0.

Lessons to be learned:
  • Start off in low speed when beating egg whites.
  • Check pan size. When in doubt, use smaller pan.
  • Even out batter because it will not spread and become even in the oven.
  • Follow tea towel and powdered sugar step.
  • Flip back to have top side spread with cream.
At least, I don't think I am making the same mistakes with each attempt. The very first time I spread cream on a hot cake..