Showing posts with label blackberry. Show all posts

Wednesday, January 27, 2016

Salted Caramel Blackberry Brownies


Blackberry Brownies
recipe adapted from Food Mouth
makes one 8" square pan
55g (1/4 cup) unsalted butter, melted
52g (1/4 cup) coconut oil, melted
70g (approx. 1/3 cup) granulated sugar
100g (approx 1/2 cup) golden brown sugar
85g (3/4 cup) extra dark cocoa powder*
2 eggs
1 teaspoon vanilla
1 teaspoon baking powder
1/8 teaspoon fine sea salt
85g (3/4 cup) all-purpose flour
170g (6 oz.) blackberries
3/4 cup salted caramel sauce (see recipe to follow)
*60g natural unsweetened cocoa powder + 25g instant coffee powder

Subbed 30% cocoa powder with instant coffee powder.
Whisk together sugars, cocoa powder and melted oil.
Whisk in eggs and vanilla until smooth.
Sift in dry ingredients.
Fold in blackberries.

Pour into prepared pan.
Do not drizzle salted caramel as shown.
1. PREP: Preheat oven to 350F and line a 8-inch square pan with parchment paper.
2. WET: Melt butter and coconut oil using double boiler or microwave. Combine sugars and cocoa powder in bowl and stir in butter/oil until smooth.
3. Add eggs and vanilla, incorporating until smooth.
4. DRY: Sift baking powder, salt, and flour in separate bowl. Stir in wet mixture until almost combined.
5. BERRIES: Fold blackberries in.
6. ASSEMBLE: Pour half of batter into prepared pan. Spoon caramel over top in an even layer. Spread remaining brownie batter on top.**
7. BAKE: Bake 25-30 minutes until a tester comes out clean.
**Did one layer and drizzled caramel on top. Do not do this as caramel burns ):

Burnt caramel?
Fresh out of oven.


Salted Caramel Sauce
recipe adapted from Made with Chobani
1/2 cup sugar
2 Tbsp butter, unsalted, cut into pieces
1/4 cup heavy cream
1/2 tsp fine sea salt
Swirl sugar around pan until evenly caramelized.
Final product- darker than I wanted.
1. HEAT: Place sugar and salt in a medium sized pot and turn on medium high heat. Do not stir. Swirl pan to avoid sugar burning.
2. KEEP AN EYE ON THIS: Let sugar come up to 315° or till it turns red-brown. Once sugar has reached desired temperature/color, remove from heat.
3. WHISK: Add cream all at once and whisk to incorporate. Then add butter and whisk to incorporate.
4. COOL: Remove from heat and cool to room temperature. 

I never had blackberries in brownies, but this combo works! The tartness of the blackberries is refreshing and resets the palette with each bite against the rich and indulgent chocolate. Since I didn't have enough cocoa powder, I took a leap of faith and subbed almost 30% with instant coffee powder. The batter smelled absolutely delicious and the result is serendipitous. The coffee cuts down the sweetness and intensifies the chocolate in these brownies, making it more grown up friendly.


I doubt this is the first time I make salted caramel, but I really can't recall when was the last time. I am happy to say though that this latest (and possibly first) attempt of salted caramel was a success! I don't have a candy thermometer so I timed everything based on color. My sugar actually started to sizzle and bubble when it was near red brown which could've been a sign that it was burning. The salted caramel has the faintest burnt taste, but it could be me being paranoid from the sizzling.

Also, lesson learned- do not bake salted caramel. it burns! I got lazy trying to spread the first thin layer and dumped the idea of sandwiching caramel in between the batter. I should've just left it out all together and drizzled it on post bake. The salted caramel drizzle ended up turning slightly dark in the oven and added a slightly roasted flavor (or bitterness?) to the brownies. 


Taste: 3.5 stars out of 5
Rich and intense chocolate flavor without any melted chocolate! Roasted coffee flavor. Slightly bitter from burnt caramel.
Texture: 4 stars out of 5 
Enjoyed these both fresh out of the oven and chilled. When hot/warm, it's extremely moist resembling a molten chocolate lava cake. I prefer them chilled when the berries are cold and the brownie texture is dense and fudgy.

Sweet tooth satisfied.

Wednesday, December 2, 2015

Mixed Berry Oat Streusel Bar

I can't believe berries are still in season in December, and are they juicier and sweeter than the ones in Summer?!! The Fatty's mom has been too kind to stock up berries for us each weekend. There's so much left over even after our weekend fix of acai bowl (which should be more accurately named as berries bowl now). Thank you for the generosity and thank you for longer berry season! 
Happy belated Thanksgiving.

These bars are fairly simple to make as with most of my bakes. The oatmeal almond butter mixture conveniently and strategically doubles as the base and as the streusel topping, killing two birds with one stone! The mixture firmly pressed into the pan creates a hearty and dense base for the lightly sweetened mixed berry filling to lay on. The streusel along with the sliced almonds on top brings the whole thing together with its crispiness and stunning visual. 


Mixed Berry Oat Streusel Bar
recipe adapted from Sally's Baking Addiction
makes one 8x8" pan or 9-12 bars
Mixed berry filling:
2 Tbsp (15g) cornstarch
2 Tbsp (30ml) warm water
2 cups (330g) mixed berries *I used a mix of blackberries, blueberries and raspberries
less than 1/4 cup (65g) pure maple syrup
1 Tbsp chia seeds 
Oatmeal base + streusel:
2 and 1/4 cup (180g) quick oats
1 teaspoon ground cinnamon
1 cup (250g) unsalted almond butter
1/6 cup (55g) pure maple syrup
1/4 cup (60ml) coconut oil, melted
1 large egg, beaten
1/2 cup (50g) sliced almonds


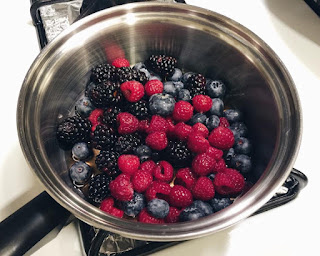
Bring berries and maple syrup to a boil.
What you need for the oatmeal base/streusel.
Mix everything together until evenly combined.
Mixture will be wet.
Reserve 1/2 cup from streusel.
The three layers before assembly.
Spread mixed berry filling on top of firmly pressed base.
Crumble streusel/sliced almonds and lightly press into filling.
Start by making the mixed berry filling first -
1. Mix cornstarch with warm water until cornstarch has dissolved and there are no clumps. Set aside.
2. Combine berries and maple syrup together in a small sauce pan over medium heat. Bring to a boil and stir well.
3. Remove from heat and stir in pre-mixed cornstarch and chia seeds.
4. Whisk until all clumps are gone and set aside to thicken and cool. 
For the base/streusel -
1. Preheat oven to 325F. Line a 8x8" baking pan. Set aside.
2. In a large bowl, combine quick oats, cinnamon, almond butter, maple syrup, coconut oil, and beaten egg. Mix until all of the oats are moistened and the mixture is thoroughly combined.
3. Reserve 1/2 cup of oat mixture. Firmly press remaining oat mixture into prepared baking pan.
4. Spread mixed berry filling on top.
5. To the reserved 1/2 cup oat mixture, add sliced almonds. Crumble and light press down into berry filling.
6. Bake for 25-30 minutes.
7. Allow to cool completely before cutting. 
*Squares stay fresh covered tightly at room temperature or in the refrigerator for up to 5 days.
*Make ahead tip: Squares freeze well up to 2-3 months. Thaw overnight in the refrigerator before enjoying.


There's no refined sugar and no butter in these bars, however, be warned that there's a good amount of almond butter along with coconut oil added to bind the oat mixture together. This brings each bar with about 21g/1.5Tbsp of almond butter to a calorie count of 310 and 32% daily value for fat! Although all ingredients used are wholesome and "good" for you, I highly suggest limiting to 1 bar per day.


If making these again, I would decrease the amount of almond butter and coconut oil added and try substituting with pureed dates. The making of these reminded me of my granola bars


Taste: 4 stars out of 5
Lightly sweetened and lovely tart berry filling. Oat mixture is rich and indulgent tasting.
Texture: 3.5 stars out of 5
Oat base is a dense, slightly chewy, and moist/a bit oily. Streusel could be more crispy/hard.