Monday, February 23, 2015

Kettle Corn Walnut Oatmeal Cookies

"Chewy and Soft with some Crispy Elements" - Fatty


@itszwa
As the Fatty put it, these cookies were welcoming- welcoming him to eat it all up. Hehe. With the reduced sugar and added caramel-y favor from the kettle corn, these cookies were quite addicting even to a person who is pro-crispy cookies (aka me).


Kettle Corn Walnut Oatmeal Cookies
recipe adapted from Averie Cooks
makes about 24 cookies

1 large egg
1/2 cup unsalted butter (1 stick)
1/4 cup light brown sugar, packed
1/8 cup granulated sugar
1 teaspoon vanilla extract
1 1/2 cups old-fashioned whole rolled oats
3/4 cup all-purpose flour
1/2 teaspoon cinnamon, added to taste
1/2 teaspoon baking soda
pinch salt, optional and to taste
1 heaping cup kettle corn, chopped
1/2 cup walnuts, chopped

1. To the bowl of a stand mixer fitted with the paddle attachment, combine the egg, butter, sugars, vanilla, and beat on medium-high speed until creamed and well combined, about 4 minutes.
2. Stop, scrape down the sides of the bowl, and add the oats, flour, cinnamon, baking soda, optional salt, and beat on low speed until just combined, about 1 minute.
3. Stop, scrape down the sides of the bowl, and add the kettle corn and walnuts, and beat on low speed until just combined, about 30 seconds.
4. Using a (1 tbsp) cookie scoop, or your hands, form approximately 24 equal-sized mounds of dough, roll into balls, and flatten slightly.
5. Place mounds on a large plate or tray, cover with plastic wrap, and refrigerate for at least 2 hours, up to 5 days.
6. Preheat oven to 350F, line a baking sheet.
7. Place dough mounds on baking sheet, spaced at least 1.5 inches apart and bake for 9-10 minutes.
8. Allow cookies to cool on baking sheet for about 10 minutes before serving.
*Cookies will keep airtight at room temperature for up to 1 week or in the freezer for up to 6 months. Alternatively, unbaked cookie dough can be stored in an airtight container in the refrigerator for up to 5 days, or in the freezer for up to 4 months.

ready to scoop

chilling for at least two hours!
flattened slightly
chilling (:
Donezo!
I made these cookies last Saturday on CNY day 3 for my family to go "bai lin" with. It's becoming a tradition for me each year and for each occasion to bake something for all our relatives. It's always enjoyable sharing the goodies with others and hearing that they want more or they miss what I made previously.


Knowing that there's an over abundance of kettle corn and oatmeal at home, these cookies were born. It's definitely an unique twist from the typical raisin or chocolate chip oatmeal cookies because no recipes were found with this combo. I ultimately settled for a chocolate chip oatmeal cookies recipe and subbed in my touches. I halved both sugars and baked them slightly under 10 minutes to keep the soft and chewy bite. To my surprise, some parts of the kettle corn remained crispy while others blended in with the chewiness and nuttiness of the oats. 

I love anything caramel, and kettle corns are my absolute favorite. If you are like me and want to find more ways to incorporate them into your daily snacking, this recipe is perfect! Baking them into a cookie really toned down the sweetness of the kettle corn and made them less sinful to snack on. I will be revisiting this recipe soon and play around with the "toppings." 


Taste: 5 stars out of 5
not too sweet, cinnamon/caramel nutty note
Texture: 5 stars out of 5
soft and chewy center, crispy edges and crunchy nuts

Mmm, what else can I bake Kettle Corn into?
Till next bake!

Wednesday, February 18, 2015

Black Sesame Cake with Honey Cream

Happy Chinese New Year Eve everyone!
I am currently enjoying a slice of my Asian inspired flavor Black Sesame Cake.


I am truly impressed with how this cake turned out despite my long hiatus of making layered cake (and my doubts with this no oil/butter recipe). The steps involved are really simple come to think of it, but the final product certainly makes people think otherwise. To make this cake well, all you need is a fluffy and airy chiffon cake and some whipped cream with complementing sweetener/flavor. For this black sesame chiffon cake, a lightly sweetened honey whipped cream did a wonderful job to highlight the black sesame flavor and moisten the cake. (*Credit to the half-asleeped Fatty who suggested the honey!)

Unlike previous chiffon cakes I made, this recipe calls for black sesame paste and absolutely no oil or butter. I was skeptical on how this cake would turn out for many reasons:

  1. My old black sesame paste had a very distinct separation between oil and solids. I tried my best to stir as even as possible but I probably didn't do it so well. The oil was very minimal for a cake this size.
  2. Step #2: "Add flour and powder to yolk mixture and beat till increase in volume and thick/fluffy." Doesn't gluten form if you mix the flour too much and therefore create a tough/dense cake? The typical chiffon cake recipes I used usually ask to beat the yolk mixture to thick and fluffy first and just fold in the flour. I followed accordingly, and the mixture never increased in volume. I beat until it was thoroughly combined and left it alone. 
  3. The big crack and shiny top during baking. (which turned out to be nbd)
  4. The black sesame seeds which I thought was stale-ish and used as garnish. 


This black sesame chiffon cake definitely met and exceeded my lowered expectations. The sweetness level can't be any more right. The black sesame flavor was strong and not overwhelming. The dark grey/black color was beautiful. And most importantly, it was not dry and rather moist for a no oil/butter cake. The tighter crumbs made it easy to layer and cream. I did a light crumb coat first just to ensure a nicer finish. The final presentation was leaning toward a rustic feel than perfectly smooth finish which I have no problems with.


Black Sesame Chiffon Cake
recipe adapted from Foodagraphy by Chelle
makes one 6.5" chiffon cake

3 egg yolks
70g sugar (*reduced to 50g)
50g black sesame paste
50ml water
65g cake flour
22g black sesame powder
4 egg whites

1. Preheat oven to 350F.
2. Lightly whisk together egg yolks, 20g sugar, black sesame paste and water.
(*Beat mixture till it increases in volume and become thick and fluffy)
3. Fold in cake flour and black sesame powder until well combined.
4. In a separate clean bowl, beat egg whites. When it is at foamy stage, gradually add in the sugar, with the beaters mixing constantly. Whip till stiff peaks to form meringue stage.
5. Fold in the egg whites in three batches into the egg yolks mixture.
6. Pour into chiffon molds and bake for 30 - 40 minutes.
7. Remove from oven. Invert immediately and leave to cool completely before removing from mold.

Honey Cream
1/2 pint whipping cream
2 packets honey (*next time: add 3-4 for more prominent honey flavor)

1. Beat cream on high until soft peaks.
2. Add in honey and continue beating until just under stiff peaks.

Top: whipped egg whites + black sesame flour mixture
Bottom: white folded into mixture
Before & after
Cooled, unmolded and flipped
layered and creamed!
messy crumb coat

Taste: 5 stars out of 5
Texture: 4.9 stars out of 5


the sleepy Fatty
Till next bake!

Valentine's Day Bake: Chocolate Chip Cookie Brownie Bars

Valentine's Day 2015.
Flowers for me. Chocolate Chip Cookie Brownie Bar for us.


The night before Valentine's Day, the Fatty surprised me with flowers and took me to Urth Cafe for a nice dinner date. We had his favorite blended matcha boba and my favorite spanish latte for drinks. For food, he had a prosciutto panini and I had a light refreshing farmer's salad.


Afterwards, we went back to mi casa to bake some cookie brownies. The fatty assisted with melting the chocolate and coconut oil and also taking step by step photos. He couldn't fight his drowsiness once again and was sent home by me before the brownies were done.

On Valentine's Day morning, we enjoyed some fresh cookie brownies for breakfast before heading off to Temescal Canyon for our hike. We took some cookie brownies with us on the hike, and by the time we took it out at the Skull Rock, they were all melted and mushy. (Later that day, we put the melted brownies back in the fridge and they tasted wonderful still)

After the rather intense hike, we relaxed and replenished our tiring bodies with some yummy Ike's sandwiches and an iced mint mojito coffee from Philz. A complete day of Norcal-ness in LA! If work did not exist, this would be my itinerary for everyday- bake, hike, eat, drink& repeat.


___________________________________________

Chocolate Chip Cookie Brownie Bars
recipe from Baked by Rachel
makes one 8x8-inch pan

Cookie dough ingredients:
5 tbsp unsalted butter, softened
3 tbsp brown sugar* (I used 2 1/2 tbsp turbinado raw sugar)
3 tbsp granulated sugar* (I used 2 1/2 tbsp)
1 egg
1/2 tsp vanilla extract
1/8 tsp baking powder
1/4 tsp baking soda
1/2 tsp coarse sea salt
1 1/4C all purpose flour
3/4C semi-sweet chocolate chips (I used 1/2 cup walnuts and 1/4 cup CC)

Brownie ingredients:
1/4C unsalted butter (I used coconut oil)
3 oz bittersweet chocolate
3/4C granulated sugar (I used a little less than 1/2 cup)
1 egg
1/2 tsp vanilla extract
1/2 tsp salt
2 tbsp cocoa
5 tbsp all purpose flour (I substituted 1 tbsp with instant espresso powder)
___________________________________________

Prep:
1. Preheat oven to 350 degrees.
2. Line an 8x8-inch baking pan and line with parchment paper.

For the cookie dough:
3. In a large bowl, cream butter and sugars.
4. Lightly mix in egg and vanilla.
5. Add baking soda, baking powder, salt and flour. Mix well.
6. Add walnuts and chocolate chips and mix until dispersed throughout. Set aside.

For the brownie batter:
7. Melt butter and chocolate in a double boiler, set over a saucepan with simmering water.
8. Stirring gently until completely melted and smooth.
9. Remove from heat, whisk in sugar, followed by egg and vanilla.
10. Whisk in cocoa and salt.
11. Gently fold in all flour until combined.

Final:
12. Pour brownie batter into prepared pan, spreading out evenly with an offset spatula.
13. Top off with large spoonfuls of cookie dough, press down gently.
14. Bake for 25-30 minutes. (Mine took 20 minutes)
15. Cool in pan completely before slicing. Store in an airtight container.
___________________________________________

"The brownies end up perfectly chewy while the cookies are tender and slightly crisp on the outside. Amazing." - Rachel

The fatty melting away..
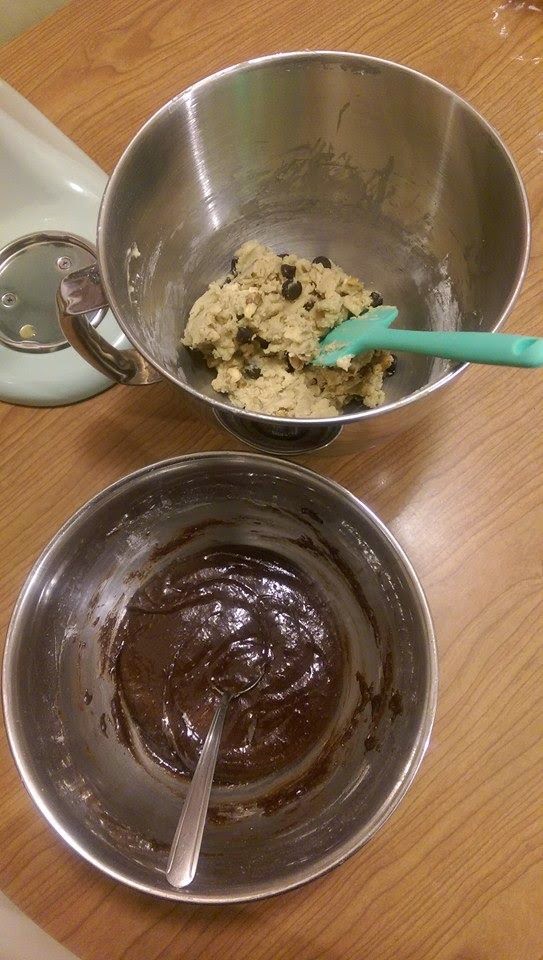
Prepping the cookie dough while the melted chocolate cools
brownie dough in the making
all ready to pour into pan
scattering the cookie dough in
ready for the oven
Cookie brownie is indeed the only way. I don't know if I can go back to baking a plain brownie now. These are too amazing and seriously combine the best of both worlds. The brownie is sweet and fudgy while the cookie is lightly salted with a nice crispiness and walnut crunch. I think these should be named as Chocolate Chip Cookie Fudge to better capture the dense and decadent brownie layer! I especially loved my coconut oil substitution which bought a nice coconut aroma to the brownie. The fresh baked room temp brownies were melty and very soft. I enjoyed some at room temp and chilled and preferred them chilled. They were less messy to eat and also the flavor seemed to have intensified after a couple hours.

The sweet and salty flavor & fudgy and crispy texture balanced out so well in these creations. The sweetness level was absolutely on point with the reduced sugar and addition of espresso powder.


A lovely sweets to all your sweethearts. Make some now and share around.

Taste: 5 stars out of 5
Texture: 5 stars out of 5


Monday, February 16, 2015

Pistachio Cake [gf]


Chio's first bake!
#yesinamedmymixer
#bakingwithchio
#breakinginmynewmixer

It goes that the first bake in my first ever pistachio colored stand mixer would be something with pistachio. Ohlala, I love to eat anything and everything pistachio (pistachio gelato and pistachio baklava to name just two). So what's more fitting than baking my favorite with my new favorite stand mixer?

#yesiamobsessed


I wanted a recipe that really highlights pistachio. I came across SugarHero's post about substituting an almond flour cake with pistachio flour (aka ground pistachio)! As much as I wanted to take credit for this ingenious idea, I got to admit I never thought about pistachio flour. This cake is all about pistachio, in fact it used up almost the whole bag of pistachios I got from TJs. This recipe requires few basic ingredients of which I already have at hand.


Pistachio Cake
recipe adapted from Simple Recipes
inspired by SugarHero
makes one 9" round cake

1 1/2 cups (6 1/3 oz) shelled pistachios, unsalted
2 tbsp powdered sugar
1 tsp baking powder
1/8 tsp salt
4 eggs at room temperature, separated into yolks and whites
zest from one orange
a little less than 1/2 cup granulated sugar, divided use
1/4 tsp cream of tartar

1. Line pan with parchment paper.
2. Process shelled pistachios in food processor for about 10 seconds, until small pieces. 
3. Add powdered sugar and continue to process in 10-second intervals until pistachios are a fine powder. Stop and scrape bowl occasionally to avoid over processing the pistachios*
4. Transfer to small bowl, add baking powder and salt. Whisk.
5. In large bowl, combine egg yolks, orange zest, and 1/4 cup granulated sugar, and whisk well. 
6. Add pistachio mixture and stir with spatula. Mixture will be very thick and sticky.
7. Whip egg whites on medium speed until foamy. Add cream of tartar and continue whipping, gradually increasing the speed until you reach medium-high. When soft peaks form, start adding remaining 1/4 cup of granulated sugar, a tablespoon at a time, until it’s all incorporated. Whip until egg whites form firm peaks and glossy.
8. Add quarter of egg whites to pistachio mixture and fold. Add remaining whites in three batches and fold gently until no streaks.
9. Pour into pan and bake the cake at 350 F for 20-25 minutes.

Grinded pistachio smells so good!
yolk mixture + pistachio

chio working hard
almost to stiff peak!
loosening the yolk/pistachio mixture with some whites

fluffy batter ready to pour into pan
I honestly wasn't sure what to expect of the texture since this is my first time trying my hands on a gluten free cake. This cake rose beautifully with a tight yet light crumbs. Each bite was very nutty due to the not so fine powder pistachios. The texture was certainly on point, however, with the huge amount of pistachios I used, I felt like I couldn't taste enough of the pistachio aroma. Maybe a few drops of pistachio essence would help next time. I would also lower the sugar as well as the orange zest to bring out the pistachio flavor.

dented pan = lopsided cake lol


Overall, I am happily satisfied with chio's first bake. Chio definitely eased and accelerated the process. And it's always fun to have a new toy in the kitchen!


Taste:3.5 stars
Looking for a more intense pistachio flavor
Texture 4.5 stars
Moist, light and nutty!

happy baking (;


--Next on the blog: Valentine's Day Bake- Cookie Brownie--