Thursday, September 15, 2011

Sour Cream Coffee Cake!!


Bookmark this recipe now! It's so worth a try or two or three or more! It's absolutely delicious! The cake itself is buttery, moist and fluffy. And the cinnamon sugar nutty layers just push that cake to perfection. The crunch of the walnuts goes oh so well with the moistness of the cake(: Ahhh, bake it now! My mouth is watering just from writing this.

I wanted to try this recipe so bad that even though I had way less than 12oz of sour cream in the fridge.. I went ahead with the baking. It came out really good still! So I can't imagine how much more perfect and moist-er this cake can get!

Absolutely divine. You will see me make this cake quite a lot from now on!

Sour Cream Coffee Cake
-recipe adapted gimme some oven
- makes one 9x13 or 8x8 pan

Cake:
1/2 cup (1 stick) butter, room temperature
1 cup sugar* (I used around 3/4 cup)
2 eggs
2 cups flour
1 tsp baking soda
1 tsp baking powder
1/2 tsp salt
1 (12 oz) container of sour cream* (I used a little less than 8oz)
1 tsp vanilla extract

Topping:
1 tsp cinnamon
1/4 cup sugar
1/4 cup brown sugar
1 cup chopped pecans or walnuts

1. Cream together butter and sugar.
2. Add eggs to the mixture, one at a time, beating well after each addition.
3. In a separate bowl, stir together the flour, baking soda, baking powder and salt.
4. Add the dry ingredients to the creamed mixture alternately with the sour cream and vanilla. Mix until combined.
5. Then pour half of the batter into a greased 9″x13″ baking pan, and sprinkle with half of the topping.
6. Add the remainder of the batter on top, and sprinkle with the remaining topping.
7. Bake at 350 degrees for 30-35 minutes, until a toothpick inserted in the middle of the cake comes out clean.


Taste: 5 stars out of 5
Texture: 5 stars out of 5

Wednesday, September 14, 2011

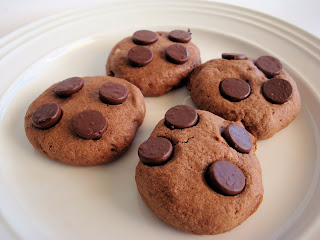
Chocolate Chip Cookies


Chocolate Chip Cookies
recipe translated and adapted from Dessert & Baking DIY
- makes around 20 cookies

100g butter, room temperature
75g icing sugar
1 egg
150g flour
2 tbsp cocoa
1/8tsp salt
1 tbsp chocolate chips
3 tbsp almond flakes

1. With wooden spatula, cream butter and sugar until fluffy and pale.
2. Mix in egg until well combined.
3. Add sifted flour, cocoa and salt. Mix (not in one uniformed direction).
4. Mix in almond flakes.
5. Portion dough and form balls.
6. Slightly flatten dough and place chocolate chips on top.
7. Bake at a 170C/ 338F preheated oven for 20 minutes.
8. Cool.


Sadly, this is not a chocolate chip recipe I would go back to. The cookies came out not crunchy nor chewy. It was like a dense and doughy cookie with a prominent flour-y taste. I know for sure it wasn't underbaked. It was dry! Mmmm, and I don't think I messed up at any steps. So yeah.. I would rather just go back to my trusty NM Chocolate Chip Cookies recipe next time.

Taste: 1 star out of 5 (no rich buttery or chocolate flavor, weird flour-y taste, 1 star for chocolate chips)
Texture: 1 star out of 5 (dense, dry)

Tuesday, September 13, 2011

Quiche Lorraine


Broccoli, mushrooms, ham, seafood, spinach.. There are so many kinds of quiche. And they all sound so yummmmy(:

I have been wanting to try quiche for a long long time. A flaky tart crust, a fluffy egg center. What is there not to love? I initially planned on having my first quiche during a Sunday brunch at a nice little cafe I have found. On their menu, they had two kinds of quiche, veggie and seafood. Unfortunately, they ran out of BOTH that morning.

Sad as I was, I went online to search for quiche recipes once I got home that evening! It didn't seem too hard. And it was a good idea since I can be picky about the fillings and have only what I like in it. Actually, I like a lot of things.. It was hard for me to decide on bacon/ham and cheese. But I thought I would start things off basic and traditional! Next time, I would definitely go more adventurous and not too greedy about the filling. I poured a little too much in the tart and it spilled over and under the tart as it bubbles and cooks.

Quiche Lorraine
recipe translated from Dessert & Baking DIY
- makes one 6" tart & three mini tarts

Crust
50g unsalted butter, cold and cubed
100g AP flour, sifted
1/8tsp salt
1 yolk
20g ice water

1. Combine flour and salt in bowl. Rub butter into the flour/salt with fingertip until it has a sandy texture.
2. Make space in the center of the flour/salt/butter mixture. Pour yolk and water in. Mix with spatula.
3. Form dough into a ball shape. Wrap with saran wrap and fridge for 30 minutes.
4. Place dough in between two saran wraps. Slowly roll dough out 2-3mm thick
5. Place on tart mold. Use knuckles to push in edges. Cut off excess.
6. Poke holes across dough with folk.
7. Bake at a 400F preheated oven for 15 minutes.


Filling
2 eggs
20g shredded cheddar cheese
70g bacon, diced
70g whipped cream
salt and pepper to taste

1. Fry bacon.
2. Hand whisk egg (keep tip of whisk touching bottom of bowl --> reduces air)
3. Add cream, salt and pepper to egg. Whisk.

4. Assemble everything like so.


- Place bacon, then cheddar cheese and strained egg/cream mixture on top of tart.

5. Bake at 400F for 20 minutes or until golden brown.
6. Remove mold.
7. Serve (:


Taste: 3.5 stars out of 5 (can use a little more seasoning and definitely elevated with a more refreshing filling; i find the ham and cheese combination a little on the heavy side)
Texture: 4 stars out of 5 (tart is flaky and nice, egg mixture can be a little fluffier but is as good as it can get on a first try)

Monday, September 12, 2011

Coconut Macaroons


This coconut macaroon can literally be whipped up in seconds! It's THE perfect remedy for those random sweet cravings :>

Have some fun with them!

Dunk in chocolate.
Drizzle chocolate on top.
Mix in chocolate chips.
etc.
etc.

Chocolate and coconut are a match made in heaven!

Coconut Macaroons
recipe adapted HALVED from Martha Stewart's Cookies
- makes about 9 cooies

3/8cup (87.5g) sugar*
5/8cup (82.5g) unsweetened shredded coconut*
1 large egg whites
1/2teaspoon pure vanilla extract
Pinch of salt

*I used sweetened shredded coconut so I reduced the sugar to 1tbsp.


1. Preheat oven to 325F.
2. Line a baking sheet with parchment paper.
3. In a large bowl, combine sugar, coconut, egg whites, vanilla, and salt. Use your hands to mix well, completely combining ingredients.
4. Dampen hands with cold water. Use 1 1/2 tablespoons to form mounds; place on prepared baking sheet, spacing about 1 inch apart.
5. Bake until golden brown, 16 to 17 minutes, rotating halfway through. Let cool on a wire rack.

Note: Cookies can be stored in an airtight container at room temperature up to 3 days.

Taste: 4 stars out of 5 (a tad bit too sweet)
Texture: 5 stars out of 5 (crunchy and chewy)

Next time I would omit the sugar all together if I am using the sweetened coconut flakes again. And definitely dip them in chocolate!

Sunday, September 11, 2011

Custard Pudding


Cooking with the Dog is such an addicting cooking show on youtube. After my failed attempt at their Melon Pan, I am once again determined to try out their Custard Pudding recipe.

Simple ingredients.
Simple steps!


Custard Pudding
recipe adapted from Cooking with the Dog on youtube
- makes 4 130ml/4.4fl oz molds

Caramel
4tbsp sugar
1tbsp water
1 1/2- 2tbsp hot water

Egg Mixture
2 eggs
250ml milk
4 tbsp sugar

1. Coat molds with unsalted butter.
2. Put sugar and water in a pot. Heat pot on medium heat. Heat until surface becomes lightly colored.
3. Swirl the pot to even out sugar water.
4. Remove pot from heat once sugar has been caramelized.
5. Quickly add hot water into pot and swirl.
6. Pour caramel evenly into the molds.

7. Lightly whisk egg. (Keep tip of whisk touching bottom --> reduces foam)
8. Add milk and sugar in a pot. Turn on heat and stir until all sugar has been dissolved.
9. Add milk to egg while whisking the mixture.
10. Sieve egg mixture. Scrape bottom of sieve.
11. Remove foam on top with spoon.
12. Pour evenly into the molds.
13. Cover molds with aluminum foil (prevents surface from becoming dry).
14. Heat water in pan. And place molds in (water should go halfway up the molds). Turn heat down and keep water just under boil.
15. Steam for 18-20 minutes.
16. Cool and store in fridge.
17. Serve by unmolding pudding onto a plate or eating right out of the mold!


^pictures from first attempt (caramel was not cooked long enough)

I actually made this recipe a couple times since I first tried it. I'd say these are great snacks for the summer cause they are usually served chilled. The part I struggle the most with in this recipe is definitely the caramel. It's so hard to get it to the texture where it will set after you pour into the molds. Oh well, I believe practice makes perfect. And either way, the custard pudding tastes great!

Taste: 5 stars out of 5 (perfect sweetness balanced with slightly bitter caramel, egg-y)
Texture: 5 stars out of 5 (silky, smooth)

Enjoy ;>

Saturday, September 10, 2011

Melon Pan Attempt #1&2

It sucks when I don't keep posting as I bake. This post should've been up back in early June.. Now, I kind of forgot which recipe I used. But judging from the portions each batch makes.. I think my first recipe was from Corner Cafe and second was from Cooking with the Dog.

1st----------------------------------------------------------------------


Bun recipe (here)
Cookie dough recipe (here)


^I also made an open face coconut bun! (More like it fell apart as I was wrapping it and I just let it be.)


Taste: 2 stars out of 5 (the sweetened coconut mix I put in some of the bun hid any off flavor of the bun dough)
Texture: 2 stars out of 5 (this bun recipe is softer than Cooking with the Dog's)

2nd----------------------------------------------------------------------


I've been following Cooking with the Dog on youtube for quite a while now. And when their tutorials on Melon Pan came up. I was beyond excited! The lady made them seem super easy& fun to make and super tasty!

The truth is bread making is not as easy as it looks. My bread came out edible the day out of the oven. But the next day it was dry and rough (still edible). The texture was dense and not fluffy as the ones I like to eat. I found that a lot of the homemade bread has this problem- hardening overnight.. How do bakeries keep them so soft and fluffy over days??! Is it really chemical additives? Or am I just lacking the proper techniques..

Well anyways, taste-wise the pan was not that great either. The flour taste of the bun dough was prominent. I suspect maybe a little milk powder would eliminate that problem. The one thing I enjoyed the most was probably the cookie dough. It was crunchy and sweet. And compared with the recipe from Corner Cafe, I prefer this one more. I would maybe try using this cookie dough on a fluffier bun next time.


Melon Pan
recipe from Cooking with the Dog on youtube
-makes 5 buns

Cookie Dough

25g unsalted butter, room temperature
35g sugar
25g beaten egg, room temperature
80g cake flour
1/4tsp baking powder

Bun Dough
140g bread flour*
25g sugar
1/3tsp salt
5g non- fat dry milk powder (omitted)
3g(a little less than 1tsp) instant yeast
1tbsp beaten egg
70ml warm water
15g unsalted butter, room temperature

*I used a mix of 50g custard powder, 50g AP flour and 40g bread flour.


1. Start by making cookie dough first- Cream butter with whisk. Gradually whisk in sugar. Whisk until sugar has dissolved.
2. When color turns near white, slowly whisk in egg.
3. Mix the cake flour and baking powder together. Sieve for 2 times.
4. Add 1/3 of flour mixture to the butter. Lightly mix with spatula. Repeat for the rest. Do not overmix!
5. Shape dough in cylinder shape. Wrap with plastic wrap and fridge for an hour.
6. Divide the dough into 5 equal pieces.
7. Shape each dough piece into ball. Flatten into disk.
(Return dough to fridge for easier handle)

6. Now onto the bun dough- Add sugar, salt, milk powder, yeast and bread flour to a bowl and whisk.
7. Beat egg with warm water and gradually stir with a spatula into flour. Stir until evenly mix.
8. Transfer the crumble flour mixture and knead/ throw until less sticky.
9. Flatten dough and spread on butter. Continue kneading for another 10 minutes until the surface is smooth and glossy.
10. Shape dough into ball and let it rest/proof in a covered bowl for 40 minutes or until ~2x in size.
11. Finger test- Coat finger with flour and poke into the dough. If the hole does not spring back, it is ready.
12. Lightly flatten the dough and roll into a long cylinder.
13. Divide into 5 equal pieces.
14. Shape each piece into ball. Cover with plastic wrap and let it rest for 20 minutes.
15. Reshape each dough into ball.

16. Cover with cookie dough and adjust the shape.
17. Hold the dough upside down and stretch the cookie dough into the center.
(I wasn't able to stretch my cookie dough cause it was too soft& melty. I just loosely laid it on top of the bun dough)
18. Pinch bottom of dough and dip the cookie dough in sugar. Make diagonal patterns on top with scraper. Repeat with the rest.
19. Rest for 40 minutes until ~2x in size.
20. Bake in a 340F preheated oven for 12 minutes or until golden brown.


^gave up taking a clear picture when they came out unsuccessful. It almost looks underbaked in the center ):

Taste: 1 star out of 5 (flour-y bun, 1 star for the sweet cookie dough)
Texture 1 star out of 5 (dry and dense, 1 star for the crunchy cookie dough)

--> Mission melon pan: failed.