Sunday, July 31, 2011

Felt Food 5: Strawberry + Blueberry Cake


This is so far my favorite piece of felt food I made. You see those stitches on the edge of that cake base? It took forever but I think it's totally worth it. (:

It is also the first time I attempt making a halved strawberries and blueberries. I think they came out pretty well! Whatd'ya think?

Saturday, July 30, 2011

New York Cheesecake

Continuing the mini 6inch cake theme from last post, here's my 6inch New York cheesecake! I have been wanting to make New York cheesecake for a while, but I was always so thrown off by the huge amount of cream cheese it needs. Well, I guess it makes sense. The more cream cheese you have, the richer the cheesecake is. But yeah, I just couldn't let such an indulgent and guilty treat come to life.. and into the stomach of my loved ones.

But hey!! I found the perfect solution: a MINI New York cheesecake!
A little bit won't hurt(:


New York Cheesecake
-recipe from translated from Dessert & Bakery DIY
-makes one 6inch round cake

282g cream cheese, room temperature
63g melted butter
68g sugar
113g or 2 eggs, lightly beaten
1tsp lemon juice
1/2tsp lemon zest

50g sour cream
25g sugar

1. Oil and flour pan (skipped; I made a graham cracker crust instead)
2. Beat cream cheese and sugar till no bumps
3. Add eggs in 5-6 batches, each batch beat for 2 minutes
4. Add lemon juice, lemon zest and butter. Thoroughly mix
5. Bake at 338F for 30-35 minutes
6. Beat sour cream and sugar till sugar no bumps/ sugar dissolves
7. Pour on top of cheesecake after cheesecake is done
8. Return cake back in oven for an additional 5-10 minutes


Nomnomnom! Rich, decadent and perfect for a family of 4 to consume within a week. (:
I especially love the addition of sour cream on the top of the cheesecake. It adds a tangy-ness and sweet-ness that balances out the heavy-ness of the cream cheese! And not to mention, the sour cream made for a lovely presentation too!

Taste: 5 stars out of 5
Texture: 5 stars out of 5

Friday, July 29, 2011

Felt Food 4: Chocolate Chestnut Cake


There seems to be a cycle in the year where I get this momentum to do a bunch of artsy stuff. I believe that time has come! It's been almost a year since I last touched felt food. And lately, once I start on a felt project.. I can't stop! I have four more felt food projects coming in the next 4 days! Keep checking back(:

*And I have also been playing around with watercolor! Check back in a week for snippets of my work!

I am "ok" about how this particular chocolate chestnut cake came out. The chestnut honestly doesn't really look like a chestnut. And I am not that happy with how the whipped cream came out. It's a little on the flat side. But overall, it was fun to put this little thing together. It was my first time working with thicker pieces of felt.

Japanese Cheesecake


Japanese Cheesecake
recipe adapted and translated from Kelly's Palace
-makes one 6 inch round cake

100g cream cheese, room temperature
60g heavy cream
12g sugar
22g unsalted butter
15g cake flour, sifted
10g corn flour, sifted
2 yolk

2 white
22g sugar
1/4tsp cream of tartar

1. Put a pan filled with water in the oven and preheat to 350F. Line pan with parchment paper
2. Melt butter in microwave or double boiler
3. On slow, beat cream cheese till soft and creamy
4. Beat sugar to cream cheese in 2 batches till no bumps/ sugar dissolves
5. Beat in yolk
6. Beat in heavy cream in 3 batches
7. Add melted butter and beat till well mixed
8. Sift in cake and corn flour and fold with wooden spatula till no bumps
9. On high, beat egg white till no big air bubble
10. Add in cream of tartar and continue beating
11. Add sugar in 3 batches and beat till stiff
12. Mix 1/3 white to cream cheese/ four batter
13. Fold rest of the whites in lightly till no visible streaks
14. Pour into pan and gently tap pan on counter to get rid of large bubbles
15. Bake on hot water bath at 338F for 40 minutes.
16. Cool on wire rack and run knife around rims of pan to allow a even shrinking of the cake


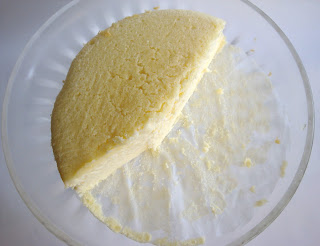
^The cake was almost gone before I could snap a nicer picture of it!

Japanese cheesecakes are one of my favorite things to bake. They taste sso-ooo good no matter how bad you messed up the cooling or how ugly and wrinkly they came out looking. :p

The reason why I chose this particular Japanese cheesecake recipe is mainly because it makes a 6inch cake instead of the usual 8 or 9. (too lazy to convert the recipe I regularly use) I am in love with mini- anything. Mini cream puffs, mini eclairs& etc. And making mini's are perfect because I get to have a variety of different mini's instead of one big cheesecake that I have to finish before baking more. Hahaha.. not sure if that made any sense. But anyways, this cake was gone before my eyes. Actually that happens a lot with Japanese styled desserts. They are so light and fluffy that you won't feel like you ate at all.

Comparatively, this cheesecake turned out average. The taste and texture are nothing spectacular. However, I am disappointed with the looks. The top just could not brown. I am suspecting that something is wrong with my big oven. I would've gave it a more toasty look if I had put it in the small oven for a couple minutes extra. But then again, I was lazy and told myself that taste> look!


^light+creamy

Taste: 4 stars out of 5
Texture: 4 stars out of 5

Thursday, July 28, 2011

Whipped Cream Cupcakes

Long long long overdue.
I swear though.. I have been baking and spending a lot of time around food. (:


Whipped Cream Cupcakes
recipe adapted from Sea Salt with Food who originally adapted it from Rose’s Heavenly Cakes by Rose Levy Beranbaum
-makes 24 mini cupcakes + a mini tube cake & a mini loaf cake
(original recipe used a 10-cup fluted metal tube pan)

225 g (2 cups) cake flour
2 tsp baking powder
1/2 tsp salt or 3/4 tsp sea salt
348 g (1 and 1/2 cups) cold heavy cream
3 large eggs, at room temperature
1 tsp vanilla extract
201 g (1 cup) sugar

1. Preheat the oven to 375˚F/190˚C. Coat a 10-cup fluted metal tube pan or whatever pan you are using* with baking spray and flour. Shake off the excess flour.
2. In a medium bowl, whisk together the cake flour, baking powder, and sea salt.
3. Using a stand mixer fitted with the whisk batter, whip the cream, starting on low speed, gradually raising the speed to medium-high as it thickens, until stiff peaks form.
4. In another bowl, whisk the eggs and vanilla until just combined.
5. On medium-high speed, gradually beat the egg mixture into the whipped cream. The mixture will thicken into mayonnaise consistency. Gradually beat in the sugar. It should take about 30 seconds to incorporate it.
6. Then add half the flour mixture into the cream and, with a large spatula, stir and fold in the flour until most of it disappears. Add the rest of the flour and continue folding and mixing until all traces of flour have disappeared.
7. Scrape the batter into the prepared pan. Run a small metal spatula through the batter to prevent large air bubbles, avoiding the bottom of the pan. Smooth the surface evenly.
8. Bake the cake for about 30 to 35 minutes, or until a wooden toothpick inserted between the tube and the side comes out clean. Let the cake cool in the pan on a wire rack for 10 minutes. With a small metal spatula, loosen the top edges of the cake and invert the cake onto a wire rack that has been coated lightly with nonstick cooking spray. Cool completely. Lightly dust the cake with icing sugar, if desired.


I am happy to present to you... *drum roll* whipped cream cupcakes! These are delicious. Words cannot describe how much I liked these cakes. The ultimate humble looking cake that tastes oh-so wonderful! The sweetness is right on the mark and the texture is crusty on the outside and moist and crumbly soft on the inside. I highly recommend this recipe to those those who also love Sara Lee's Pound Cake. These remind me so much of them!

And personally, I much much much preferred them in mini cupcakes form over using the tube, loaf or fluted pans. I like how much crust the mini cupcakes have and ohmy.. they are the perfect bite size! You can eat one whole cupcake without making a ton of mess.

Taste: 5 stars out of 5
Texture 5 stars out of 5