Thursday, January 20, 2011

Cranberry Almond Biscotti


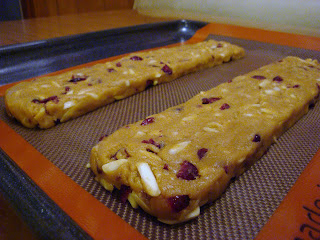
^my army of biscotti waiting for consumption

Yup. I told you I liked the Cranberry Walnut Biscotti recipe(:
Here's another batch with almonds substituting the walnuts.

I used silvered almonds instead of the sliced almonds, which wasn't a very wise decision. I think I would much prefer the sliced almonds as the silvered ones taste a little stale in the biscotti. Or I think I should have tried toasting the silvered almonds beforehand. But anywhos, they are still mucho delicious (thanks to the dough itself)!

This time, I also reduced the second baking time. I baked the biscotti for only 4 minutes more after cutting them into slices. The biscotti were noticeably softer and more crumbly. I think baking them the full 8 minutes yields a more authentic and crunchy/ toasty bite, which was just perfect. (:


^I made the full biscotti recipe (2 logs) for the first time. The texture of the dough was wetter and easier to handle.

*I need to try some with pistachio! They add a nice green touch to the appearance(: And I need to get some white chocolate. White and dark chocolate drizzles. Mhmm! Ohh, or a matcha dough base? Yum!

------------SOMETHING NEW!
Yay. I was invited by Lisa to be a part of her new linky called "Sweets for a Saturday" Head over to her blog "Sweet as Sugar Cookies" and check out what delicious goods her and others have made!

ANDANDAND! Thanks Miz Helen for hosting and inviting me to her "Full Plate Thursday" linky! Check out what else is going on at "Miz Helen's Country Cottage"

Whoopie Pie


What's a whoopie pie?
a) a cake
b) a pie
c) a cookie
d) all of the above

The answer is..

d!

A whoopie pie is alternatively called a gob, black-and-white, bob, or "BFO" for Big Fat Oreo. It is an American baked good that may be considered either a cookie, pie, or cake. It is made of two round mound-shaped pieces of chocolate cake, sometimes pumpkin cake, with a sweet, creamy filling or frosting sandwiched between them. (Source: Wikipedia)

Whatever whoopie pies are, they are good! I made them on the HUGE side this time. They were the size of a burger! For next time, I would most certainly make them SMALLER (maybe 2 tablespoon-ful dough size instead of 1/4 cup) and sandwich more filling! The more the merrier! It keeps the cake part moist(:

Taste: 4 stars out of 5
Texture: 3.5 stars out of 5 (moist on first day, dried out a little overnight)


Classic Chocolate Whoopie Pies

recipe from King Arthur Flour

Cakes:
1/2 cup butter
1 cup brown sugar, packed
1 teaspoon espresso powder, optional
1 teaspoon baking powder
1/2 teaspoon baking soda
3/4 teaspoon salt
1 teaspoon vanilla extract
1 large egg
1/2 cup Dutch-process cocoa
2 1/3 cups all-purpose flour
1 cup milk

Filling
1/2 cup vegetable shortening
1/2 cup butter, room temperature
1 cup confectioners' sugar or glazing sugar
1 1/3 cups Marshmallow Fluff or marshmallow creme
1/4 teaspoon salt dissolved in 1 tablespoon water
1 1/2 teaspoons vanilla extract

Preheat the oven to 350°F. Lightly grease (or line with parchment) two baking sheets.

To make the cakes: In a large mixing bowl, beat together the butter, sugar, espresso powder, baking powder, baking soda, salt, and vanilla till smooth. Add the egg, again beating till smooth. Add the cocoa, stirring to combine.

Add the flour to the batter alternately with the milk, beating till smooth. Scrape down the sides and bottom of the bowl, and beat again briefly to soften and combine any chunky scrapings.

Drop the dough by the 1/4-cupful onto the prepared baking sheets, leaving plenty of room between the cakes; they'll spread. A muffin scoop works well here. For smaller cakes, use a cookie scoop.

Bake the cakes for 15 to 16 minutes, till they're set and firm to the touch. Remove them from the oven, and cool on the pans. While still lukewarm, use a spatula to separate them from the pan or parchment; then allow to cool completely.

To make the filling: Beat together the butter, shortening, sugar, and marshmallow till well combined.

Dissolve the salt in the water, and add to the marshmallow mixture. Add the vanilla, and beat till smooth.

Spread the flat side of half the cakes with the filling. Top with the remaining cakes, flat side towards the filling. Wrap individually, in plastic wrap, till ready to serve.


Note: I actually didn't use the recipe for the filling. I made a filling with cream cheese instead.

Tuesday, January 18, 2011

Glazed Doughnut Muffins


Disappointed. These muffins absolutely did not resemble doughnut in my opinion. They were really dense and cakey! These should just be called cinnamon muffins. If you decide to try this recipe out, I suggest eating these within a day or two. Or, if you can.. eat them fresh from the oven. That's when they are at their best. They became densER overnight.. ):

Taste: 2 stars out of 5 (just a prominent cinnamon/ nutmeg taste)
Texture: 2.5 stars when fresh from the oven & 1.5 stars out of 5 overnight (not the same fluffy texture that a doughnut should have)

Glazed Doughnut Muffins
recipe from my baking addiction
- makes 12 muffins

For the Batter
1/4 cup butter
1/4 cup vegetable oil
1/2 cup granulated sugar
1/3 cup brown sugar
2 large eggs
1 1/2 teaspoons baking powder
1/4 teaspoon baking soda
3/4 to 1 ¼ teaspoons ground nutmeg, to taste
1 teaspoon cinnamon
3/4 teaspoon salt
1 teaspoon vanilla extract
2 2/3 cups all-purpose flour
1 cup milk

For the Glaze
3 tablespoons butter; melted
1 cup confectioners’ sugar; sifted
3/4 teaspoon vanilla
2 tablespoons hot water

Directions
1) Preheat the oven to 425°F. Lightly grease a standard muffin tin. Or line with 12 paper muffin cups, and grease the cups with non-stick vegetable oil spray; this will ensure that they peel off the muffins nicely.
2) In a medium-sized mixing bowl, cream together the butter, vegetable oil, and sugars till smooth.
3) Add the eggs, beating to combine.
4) Stir in the baking powder, baking soda, nutmeg, cinnamon, salt, and vanilla.
5) Stir the flour into the butter mixture alternately with the milk, beginning and ending with the flour and making sure everything is thoroughly combined.
6) Spoon the batter evenly into the prepared pan, filling the cups nearly full.
7) Bake the muffins for 15 to 17 minutes, or until they’re a pale golden brown and a cake tester inserted into the middle of one of the center muffins comes out clean.
8.) In a medium bowl, prepare the glaze by mixing together the melted butter, confectioners’ sugar, vanilla and water. Whisk until smooth.
9.) When muffins have cooled slightly, dip the muffin crown into the glaze and allow the glaze to harden. At this point, you can leave them as is or go for the double dip. I glazed my muffins twice.
10.) Serve warm, or cool on a rack and wrap airtight. Muffins will keep at room temperature for about a day.

Monday, January 17, 2011

Lemon and Chocolate Mousse Layered Shortcake


Layered cakes take a lot of planning and preparation. But sometimes, not knowing what you are doing can result in a good surprise!

I originally intended to do a boring simple sponge cake with one layer of whipped cream and strawberries, and then maybe do a coat of whipped cream on the outside.

Well, turned out..

First layer of cake.
Lemon mousse.
Second layer of cake.
Chocolate mousse with cocoa puffs.
Last layer of cake.
All coated with a thin layer of lemon mousse.


this happened.


Being the resourceful me and seeing the bagful of fresh lemons my uncle gave me, I decided to change my direction a bit and do a lemon cake instead. Since my mom loves the lighter chiffon cakes, and this is HER birthday cake after all.. I shall do a lemon chiffon!

Then, my thought process was as follow:
lemon curd!! --> yum --> lemon mousse! --> even yummier! --> lemon goes with chocolate --> chocolate mousse --> oh, and we got cocoa puffs --> why not throw a couple in there for the crunch --> lemon mousse and lemon chiffon --> mm, maybe a regular sponge will do!

Haha.. I totally went adventurous on this cake. (My chocolate mousse was actually made from the espresso ganache I had from the macarons. I just whipped up some heavy whipping cream and mixed the two together. I like the mousse a lot actually!! : D)

I was right on the lemon and chocolate pairing but wrong for thinking that the cocoa puff would still be crunchy after mixing it with the mousse. Overall, I think it lives up to my expectation. I just wish the cake layers were thicker. Next time, I shall double the cake base recipe and make a taller cake.


Japanese Shortcake
(sponge cake)
recipe from La Fuji Mama
- makes one 7" or 8" layered cake

4 large eggs, white and yolks separated
4.2 ounces (120 grams, 9.5 tablespoons) granulated sugar, sifted once
3 tablespoons milk, at room temperature
1/2 teaspoon vanilla extract
4.2 ounces (120 grams, 14 tablespoons) cake flour, sifted 3 times
1.2 ounces (22 grams, 2.3 tablespoons) butter, melted

1. Preheat the oven to 350 degrees Fahrenheit (170 to 180 degrees Celsius). Line a 7 (18cm) or 8-inch circular cake pan with parchment paper, or grease the cake pan with butter, then lightly coat the pan with flour.
2. Add the sugar to the egg whites, and beat the egg whites until they are stiff and glossy.
3. Add the egg yolks to the egg white mixture, and gently whisk until the yolks are incorporated.
4. Add the milk, vanilla extract, and flour (in that order) to the batter and gently fold them into the batter with a spatula. Fold in the melted butter until it is well combined.
5. Pour the cake batter into the prepared cake pan, and get rid of any air bubbles in the batter by dropping the pan on a counter once or twice. Bake the cake for 25 to 30 minutes. The cake is done when it is golden brown and springs back when pressed lightly. Let the cake cool completely on a wire rack. Run a blade around the inside of the pan to loosen the cake, and remove.

(Lemon Mousse recipe will be updated later)


Lemon mousse taste: 3 stars out of 5 (refreshing and spring- like, slightly overpowering)
Chocolate mousse taste: 4.5 stars out of 5 (delicious!!)
Mousse texture: 4 stars out of 5 (as good as I can make it)
Cake taste: 4 stars out of 5 (firm enough to use for layered cakes)
Cake texture: 4 stars out of 5 (my layers were pretty thin.. I think it was on the fluffier side)

Friday, January 14, 2011

Cranberry Walnut Biscotti


Favorite biscotti recipe.
(BOOKMARK NOW!)

Great to make in batches for the holidays!
(Short prep time& long shelf life!)
& also greaaaat with lots of other variations
Pistachio, almond, blueberries, chocolate chips..
and/ or CHOCOLATE DIZZLE<3


Cranberry Walnut Biscotti
recipe from allrecipes.com
- makes 1 log (about 18 cookies)

2 tablespoons light olive oil
1/4 cup and 2 tablespoons white sugar
1 teaspoon vanilla extract
1/4 teaspoon almond extract
1 egg
3/4 cup and 2 tablespoons all-purpose flour
1/8 teaspoon salt
1/2 teaspoon baking powder
1/4 cup dried cranberries
3/4 cup pistachio nuts

1. Preheat the oven to 300 degrees F (150 degrees C).
2. In a large bowl, mix together oil and sugar until well blended. Mix in the vanilla and almond extracts, then beat in the eggs. Combine flour, salt, and baking powder; gradually stir into egg mixture. Mix in cranberries and nuts by hand.
3. Form log (12x2 inches) on a cookie sheet that has been lined with parchment paper. Dough may be sticky; wet hands with cool water to handle dough more easily.
4. Bake for 35 minutes in the preheated oven, or until log is light brown. Remove from oven, and set aside to cool for 10 minutes. Reduce oven heat to 275 degrees F (135 degrees C).
5. Cut log on diagonal into 3/4 inch thick slices. Lay on sides on parchment covered cookie sheet. Bake approximately 8 to 10 minutes, or until dry; cool.


Chocolate drizzles bought it to the perfect sweetness level.


Taste: 5 stars
Texture: 5 stars


Check out my other biscotti posts:

Chocolate peanut biscotti

Lenox almond biscotti

Thursday, January 13, 2011

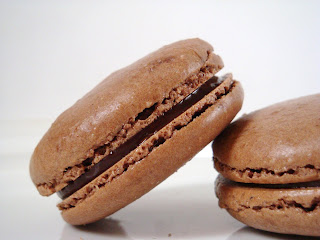
CHOCOLATE MACARON SUCCESS


:D :D :D

THEY HAVE FEET!


SOME OF THEM DIDN'T CRACK


THEY LOOK SO GOOD!
They are delicious.

Macaron success on second try. Not bad right? ( :

I slightly altered the ingredient proportions from Lebovitz's recipe and followed the same steps. Unlike last time, my batter was actually lava-flow like.


60g egg white (from 2 eggs), at room temperature
40g sugar
110g powdered sugar
60g almond flour
12g cocoa


^forming hard shell

The macarons were still too sweet for my liking. I might try reducing the granulated sugar even more (or less?) to 30g next time. Not sure if that would change the whole chemistry behind the baking. But let's experiment. I can't wait to make some crazy flavor combinations once I master these chocolate macaron.

For the filling, I attempted at making the espresso ganache. Sadly, they didn't quite solidify. The taste was exceptionally good though. Creamy. Espresso-y. And perfect balance of sweetness and bitterness. Definitely need to give this recipe another try and be more careful at the simmering step!


I also did run into the problem of the macarons sticking onto the non- stick silpat. After ripping a few of them off for a quick taste test, I googled for some solutions. :P Turns out putting them back into the oven for another 5-10 minutes works magic!

HAPPY BAKING!

Sunday, January 9, 2011

Soufflé Cheesecake Cups Take 2&3

Winter break is officially over, and I am slowly adjusting back to the no-baking& only studying mode. :'( I already find myself falling behind on some readings after just week ONE! (But then, that's only because my textbooks have not arrived yet! :p)

Anywhos, let's get back to the bakED goods from winter break.


Soufflé Cheesecake Cups! Yes, the ones I have previously blogged. I don't usually find myself baking the same recipe this many times (3 times to be exact). This definitely tells you how good they are! Soft& light!!! They are so light that you can find yourself eating a couple in one sitting :P

If you look back at my first attempt on this recipe, you can see from the pictures that they shrunk as they cooled. On my recent tries, I noticed they didn't sink as much. I think over-baking them a little and letting them cool for 5 minutes in the oven with the door ajar will help achieve a more "fluffy" top.


recipe can be found here.

Next up is the world's SALTIEST almond jam slice..


The recipe for this little thing called for TWO WHOLE TEASPOON of salt! And the sad thing is I actually followed it. What was I thinking?!?! It was INEDIBLE.

"Try and fail. But don't fail to try"


At least they turned out pretty?